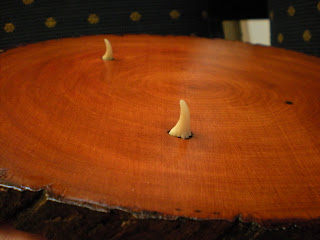
Some of you may have seen the photos from my trips to Iceland. It was a mysterious and inspiring place that has left a big mark on how I look at things. During my travels I came upon numerous interesting plants, rocks, and other detritus that I attempted to collect. A feather here, a glass-like piece of lava rock there, and various bones from birds, fish, and even a seal. These are the beginnings of a new step towards making whatever the hell I feel like, without limitations (aside from financial or time limits), exploring the act of just creating.
This first piece I envisioned as being hung on the wall next to my bed so I could hang either necklaces or my engagement ring. Now that it's made though I don't think it works that well in that way so I'm going to have to find another use for it. I'm thinking of making some sort of abstract jewelry piece to hang from the two fish teeth. Yes, those are teeth from a fish.
Next up, more fish teeth. Spencer and I tore this piece of jaw off a dried out fish head we found on the beach in Iceland. I have no idea what kind of terrifying fish this was but I've never seen anything like it. I went for a nice elegant silver chain and kept it simple.
Finally, a necklace for Spence. This is just some random bone I found on the beach. Again, very simple- Just drilled a couple holes in it, braided some linen string and threaded it through there. I think it came out pretty cool looking.
So that's all for now folks. I hope you like my new little creations. The craft store had a big sale and I got some cool new supplies that I'm excited to work with, so hopefully more to come soon!
Saturday, October 16, 2010
Thursday, July 22, 2010
A small request...
I am not loving the layout of my blog. The body of the blog is ridiculously skinny compared to the page and thus I can't put two pictures next to each other, or even a picture and text. I've tried fixing the HTML myself but to no avail. So if there's anyone out there who knows how to remedy this trivial problem please send me a message!! Thanks.
Wednesday, June 30, 2010
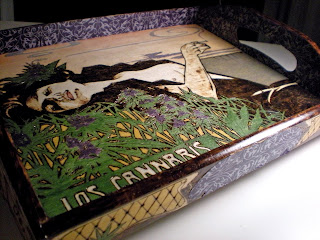
LOS CANNABIS
This is a tray I made for a friend. I wanted to do something elegant and kitschy all at the same time. Sort of a bourgeois antique mixed with Mexico souvenir. Mission accomplished methinks. I implemented my wood burning tool that had gone previously unused. I thought it would be a nice compliment to the subject matter. The process in pictures and text as follows.
Step 1.
Find an image to rip off.

Step 2.
Photocopy and trace elements I want to keep. I did a lot of research on what the plants looked like in various stages as well as different strains. I tried to mimic the layout as closely as possible to make it not look out of place. Also I thought some boobs were more than necessary.

Step 3.
With the drawing finished I had to transfer it to the tray. I photocopied it backwards, placed it on the tray, rubbed acetone on the back side and worked in small areas with a burnisher to basically rub the toner off the paper and onto the wood.
Step 4.
This is the fun part finally. I got out a scrap piece of wood to practice using the different tips on and then just jumped right in. I did all the line work first.
Step 5.
Then onto the shading, much more tricky. I think if the quality of the wood were better it would have been more smooth and less finicky, but it turned out alright regardless.

Step 6.
I took a while deciding on what colors to use. I used purple for the blossoms and mixed this color to my liking. Much to my surprise when I later decided to cover the walls of the tray in paper I found I had mixed the exact same color as the paper I had. Fate!

Step 7.
After covering the walls with some fancy purple paper I designed the outer walls of the tray. These designs were not copied from anything and aside from the little smoking lady are entirely original.


Step 8.
Burned, painted, papered and varnished. The finished product in all its glory. I'm pretty proud of it and am excited about my new skill in pyrography.


Step 1.
Find an image to rip off.

Step 2.
Photocopy and trace elements I want to keep. I did a lot of research on what the plants looked like in various stages as well as different strains. I tried to mimic the layout as closely as possible to make it not look out of place. Also I thought some boobs were more than necessary.

Step 3.
With the drawing finished I had to transfer it to the tray. I photocopied it backwards, placed it on the tray, rubbed acetone on the back side and worked in small areas with a burnisher to basically rub the toner off the paper and onto the wood.
Step 4.
This is the fun part finally. I got out a scrap piece of wood to practice using the different tips on and then just jumped right in. I did all the line work first.
Step 5.
Then onto the shading, much more tricky. I think if the quality of the wood were better it would have been more smooth and less finicky, but it turned out alright regardless.

Step 6.
I took a while deciding on what colors to use. I used purple for the blossoms and mixed this color to my liking. Much to my surprise when I later decided to cover the walls of the tray in paper I found I had mixed the exact same color as the paper I had. Fate!

Step 7.
After covering the walls with some fancy purple paper I designed the outer walls of the tray. These designs were not copied from anything and aside from the little smoking lady are entirely original.


Step 8.
Burned, painted, papered and varnished. The finished product in all its glory. I'm pretty proud of it and am excited about my new skill in pyrography.


Subscribe to:
Comments (Atom)


